Tightening a Canvas Print the easy way
A photo canvas is mounted on a wooden stretcher frame. Since wood is a natural material, it can warp and the canvas can loosen. But it’s very easy to re-tension a photo canvas. We explain how you can re-tension a canvas in just 4 easy steps.
1. Required materials
To re-tension a canvas, you’ll need 8 tensioning wedges and a small hammer. The tensioning wedges come with the canvas
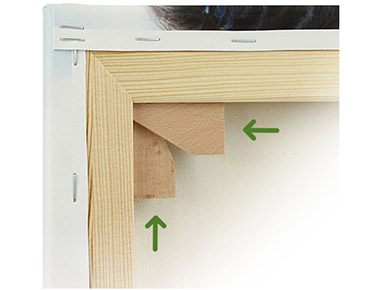
2. Insert the wedges
Insert the wedges into the respective slot in the frame so that the straight edges of these lie along the bar of the frame.
3. Insert in all four corners
Repeat this process for all four corners of the canvas so that there are two tensioning wedges in each corner.
4. Re-tension the canvas
Now carefully tap the wedges into place with the hammer – one opposite corner after another – to tighten the canvas. Done!
What you need for tighten your Canvas Print
To re-tension a canvas, you’ll need 8 tensioning wedges and a small hammer. First insert the wedges into the respective slot in the frame so that the long edges of the wedge lies along the bar of the frame. Once two wedges have been inserted into each of the four corners, the canvas can be tightened carefully using the small hammer. The canvas will tighten under the pressure.
Did you know? Avoid direct sunlight when hanging your canvas photo. Only by this the colours will last up to 200 years.
Re-tension your canvas print in 5 steps
- Take the canvas down from the wall.
- Insert two tensioning wedges into the slots for this purpose in each corner of the frame.
- Make sure that the long edge of the wedge lies along the bar of the frame.
- Slowly tighten the canvas by tapping the wedges in.
- Repeat the process on one opposite corner after the other until the canvas is tight again.